Compressed air leaks, vacuum system leaks, electrical partial discharge—these are all expensive system issues that consume power, causing companies to deal with unforeseen costs and potential production/uptime issues. Ultrasound imaging with an acoustic camera is an effective way to detect these equipment issues as part of a complete asset management plan. This easy-to-use technology typically allows professionals to complete their inspections 10 times faster than with traditional methods.
So, what should you look for when selecting an acoustic imaging camera? Here, FLIR Systems describes six must-haves that could help you make your final purchasing decision.
Effective Frequency Range
One of the first features to consider is the camera’s frequency range. You might think that you need the widest range possible in order to pick up the widest range of sounds. However, in reality, the most effective frequency range for detecting a compressed air leak is between 20 and 30 kHz. This is because using the 20 to 30 kHz range aids in distinguishing compressed air leaks from the background noise in a factory. The amplitude of machinery noise usually peaks below 10 kHz and trends down to zero at 60 kHz, whereas air leaks peak between 20 and 30 kHz. Since there is a greater difference between the air leak noise and the background noise between 20-30 khz, compared with higher frequencies, it’s easier to detect the air leak in this frequency range.
Both the compressed air and machinery noise follow the same downward amplitude trend in the 30 to 60 kHz frequency range, making it difficult to distinguish between them. Therefore, working within the 20 to 30 kHz range is more effective.
For users looking for partial discharge from a safe distance, the 10 to 30 kHz range is optimal. This is because higher frequency ranges travel shorter distances. In order to detect partial discharge from high voltage equipment in an outdoor setting, your camera needs to be attuned to lower frequency, farther-traveling sounds.
Optimal Number Of Microphones
In the pursuit of quieter noises, more is better. Acoustic imaging cameras typically employ dozens of microelectric-mechanical system (MEMS) microphones to collect and characterize sound. While MEMS are small, use little power, and are very stable, they also generate their own noise that interferes with an individual microphone’s ability to pick up very quiet sounds. The solution is to increase the number of microphones in use; simply doubling the number of microphones improves the signal-to-noise ratio enough to remove three decibels of unwanted sounds.
For example, one microphone might create enough self-noise to make it impossible for the system to pick up a compressed air leak generating a 16.5 kHz signal.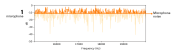
An acoustic camera with 32 microphones would be able to detect that leak, but the signal-to-noise ratio is still too poor to hear anything quieter.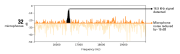
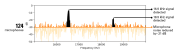
In contrast, a camera with 124 microphones can pick up both the 16.5 kHz leak and one that is 18.5 kHz, making it easy to detect, locate, and quantify the small leak.
Sound Detection Range
Adding just the right number of microphones to an acoustic imaging camera can also improve the chances of picking up very quiet noises from a long distance. This is especially important when inspecting high-voltage systems, which requires a safe distance from the energised equipment. The force of a sound signal drops significantly as one moves further away from its source. The solution is to increase the number of microphones: quadrupling the number of microphones essentially doubles the sound detection range.
Microphone Placement
The placement of microphones on an acoustic camera factors into how the camera determines the direction and location of sounds. The camera collects data from each microphone, measures the timing and phase differences in the signals, and calculates the source location. These microphones need to be grouped closely together to ensure they collect enough data on sound waves to correctly determine from what direction they originated.
Microphone Performance
Just like frequency, there is a sweet spot for how many microphones an acoustic imager hosts. A potential downside of too many microphones is each requires processing power to convert audio data signals into images—so adding too many has diminishing returns. Some manufacturers balance this by reducing the resolution of the acoustic image pixels, or “sound” pixels, but this will affect the camera’s overall performance. It’s important to have enough sound pixels to detect corona and partial discharge reliably from a distance and pinpoint its exact source.
With 124 microphones and advanced processing power, the FLIR Si124 provides industry-leading detection sensitivity, excellent acoustic image resolution and a great range.
Intelligent Analytics
The final features to consider are the computing power and analytics provided by the acoustic imaging camera and any companion software. A camera such as the FLIR Si124 offers on-camera analytics, easy-to-understand reporting, and predictive analysis using an AI/web tool. An inspector can classify leak severity, perform leak cost analysis, and partial discharge pattern analysis in real-time during a survey. Once the survey is complete, the inspector only needs to connect to their Wi-Fi network to automatically upload images to the FLIR Acoustic Camera Viewer for further, cloud-based analytics. This includes calculating the estimated yearly energy expense caused by compressed air or vacuum leaks and determining whether a partial discharge issue will require service or replacement. The Viewer can also be used to create reports to share with a maintenance team or client.
Click here to download a more in-depth article on choosing an acoustic imager.